Single Image Editor: Edit, Compare & Export One Photo in Detail
The KodiniTools batch editor is built for many images at once. Sometimes, though, a single photo needs special treatment: a tilted horizon, a subject that is too dark, a title that should go on the image, or a crop for a profile picture. That is what the single image editor is for. It opens one image from your series in its own window, shows every change live with a before/after comparison and exports the result straight to a file. Everything runs in your browser, with no installation and no upload.
How to open the editor
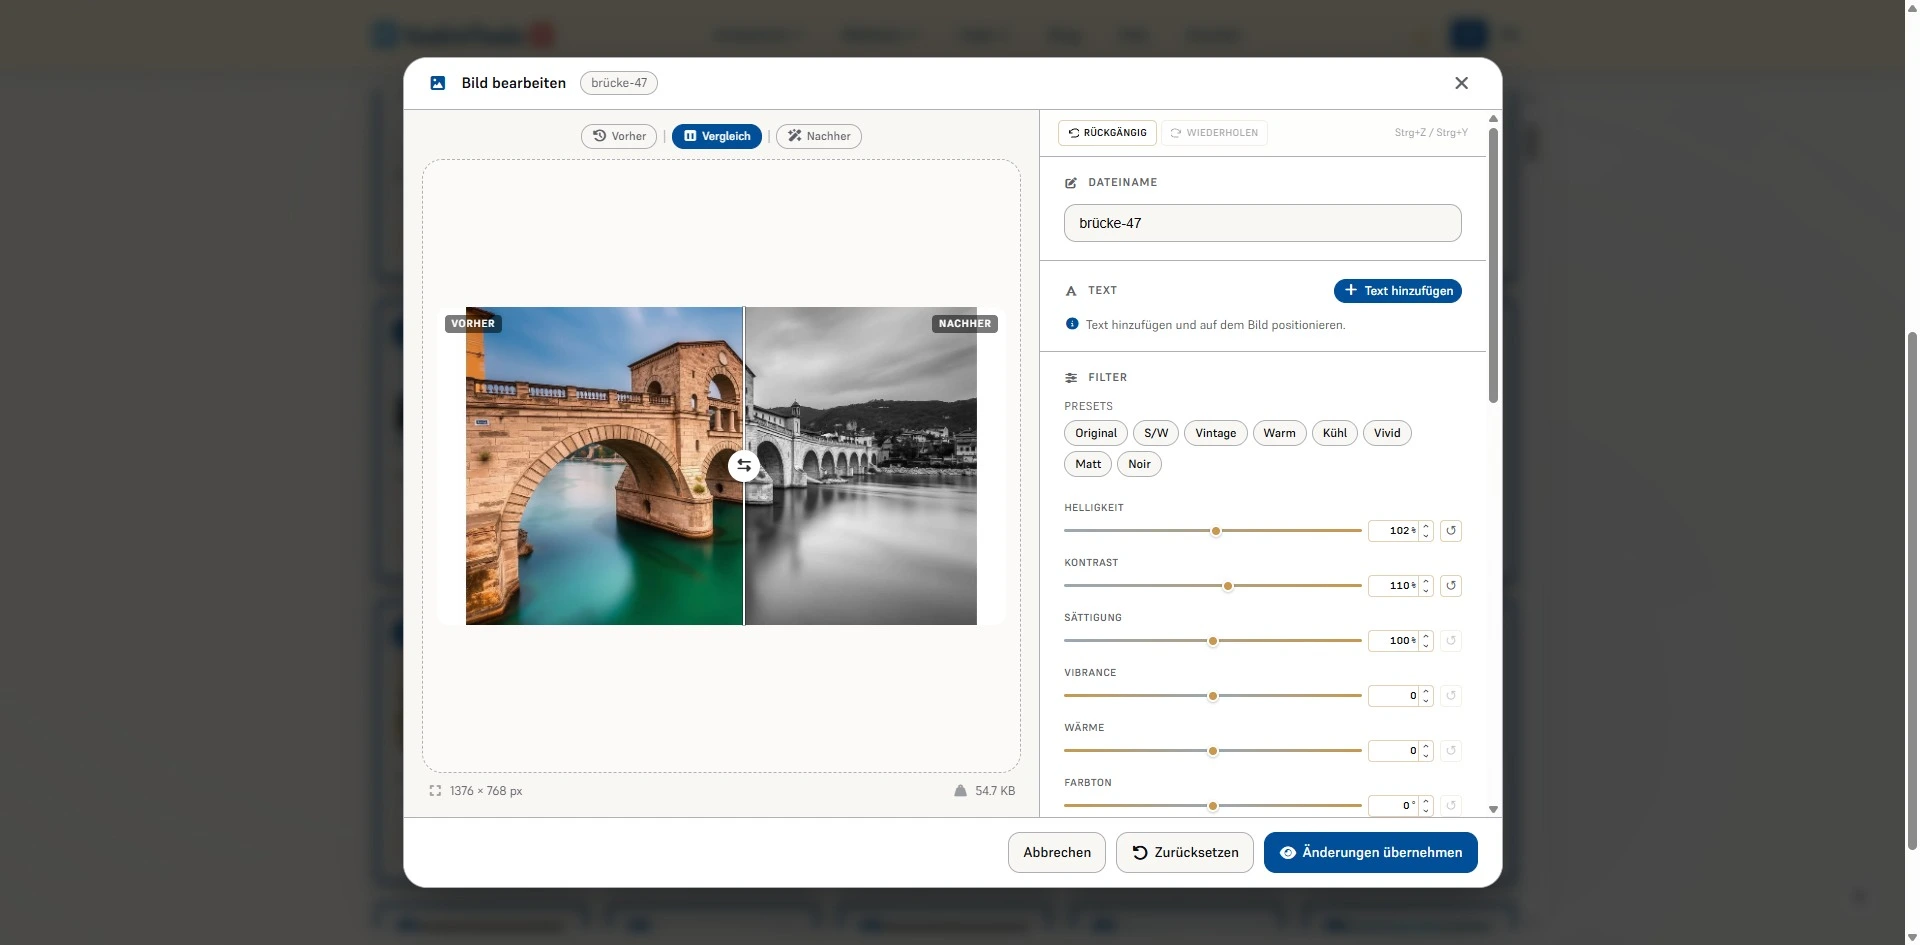
Load your images into the image series editor. Every image card in the gallery has a button with a magic wand icon (“Edit and Export”). Clicking it opens the editor for exactly that image. On the left you see the preview with its dimensions and estimated file size, on the right all tools stacked below each other, and at the top the undo and redo buttons.
Features at a glance
| Section | What you can adjust |
|---|---|
| Compare | Before, Compare (draggable divider), After |
| File name | New name for saving and export |
| Text | Multiple text layers, 19 fonts, size, color, style, alignment, opacity, stroke, shadow |
| Filters | 8 presets and 11 sliders from brightness to opacity |
| Apply to multiple images | Copy the current look to all or the selected images |
| Crop | Free, 1:1, 4:3 or 16:9 |
| Transformations | −90°, 180°, +90°, flip horizontally and vertically, straighten from −45° to 45° |
| Resize | Width and height up to 5000 px, linked aspect ratio |
| Export | PNG, JPEG, WebP or PDF as a single file |
Before, Compare, After
Three toggles sit above the preview. “After” shows the edited image, “Before” the original. In “Compare” mode both are layered: the original on the left, the result on the right. Drag the divider with your mouse or finger to the spot you want to check, such as skin tones after a color correction or the sky after adding contrast. Clicking the preview also opens the image in a large view.
Filters and presets
Presets give you a finished look in one click: Original, B&W, Vintage, Warm, Cool, Vivid, Matte and Noir. Each preset only sets the relevant sliders, for example “Vintage” with sepia, a warmer color temperature and a light vignette. Afterwards you can fine-tune every value by hand.
- Brightness, contrast, saturation: 0 to 200 % each, default 100 %.
- Vibrance: −100 to 100. Boosts mainly muted colors and leaves already strong ones largely untouched.
- Warmth: −100 to 100. Negative looks cooler and bluer, positive warmer and more yellow.
- Hue: −180° to 180°, shifts all colors around the color wheel.
- Grayscale, sepia, vignette: 0 to 100 % each.
- Blur: 0 to 20 px in half-pixel steps.
- Opacity: 0 to 100 %, handy for PNG or WebP with transparency.
Every slider has a number field for exact values and its own reset button. “Reset filters” returns all sliders to their default values at once.
Apply one look to the whole series
As soon as more than one image is loaded, the section “Apply to multiple images” appears. It copies the current filters, including the preset, to all images or only to the selection. That way you can carefully tune a look on one photo and then apply it to the whole series. Crop, size and text deliberately stay per-image, because they usually only fit one subject.
Add text to the image
“Add text” creates a new text layer. You type the text into a multi-line field and drag it to the right spot in the preview. You can add as many text layers as you like, each with its own styling:
- Font: 6 system fonts such as Arial, Georgia or Impact and 13 custom fonts such as Clash Display, Satoshi or Zodiak.
- Size and style: 6 to 300 px, bold, italic, aligned left, center or right.
- Color and opacity: any color, opacity 0 to 100 %.
- Stroke: color and width up to 20 px, so light text stays readable on a light background.
- Shadow: color, opacity, blur up to 30 px and offset from −20 to 20 px in both directions.
When you save, the text is burned into the image at full resolution.
Crop, rotate, straighten
“Start cropping” places a frame over the image that you adjust at its corners and edges. The aspect ratio is free or locked to 1:1 (profile picture, Instagram), 4:3 (classic photo) or 16:9 (cover image, video thumbnail). “Apply crop” commits the selection.
Under “Transformations” you rotate the image by −90°, 180° or +90° and flip it horizontally or vertically. The “Straighten” slider rotates smoothly between −45° and 45°. Use it to level a tilted horizon or a leaning building facade and confirm with “Apply”.
Resize and export
Under “Resize” you enter width and height in pixels, up to 5000 px per side. The chain icon links both values so nothing gets distorted. “Original size” restores the original dimensions. The preview shows the estimated new file size as you go.
Under “Export” you choose PNG, JPEG, WebP or PDF and download the image directly with “Download as file”. The export includes all current filters and uses the name from the “File name” field.
Undo, reset and save
- Undo and redo: via the buttons or with Ctrl+Z and Ctrl+Y (Cmd+Z and Cmd+Y on a Mac).
- Reset: returns image, filters and file name to their initial state.
- Apply changes: applies the new size and switches the preview to “After” so you can check the final result.
- Save: then replaces “Apply changes” and writes the result back to the image card in your series. It is included when you later export the whole series.
Step by step: edit a photo
- Load images
Open kodinitools.com/bilderseriebearbeiten and drag your images into the drop zone.
- Open the editor
Click the magic wand icon on the image card you want to edit.
- Edit
Pick a preset, fine-tune the sliders, and crop, straighten or add text as needed. In “Compare” mode you check the result against the original.
- Apply and save
Click “Apply changes”, check the result and write it back to the series with “Save”.
- Export
Either download it right away from the editor as a single file, or export it later together with the whole series as a ZIP.
Tip for consistent series: Tune the look on the most difficult photo of the series, for example the darkest one or the one with the strongest color cast. Then copy the filters to the whole series with “All images” and only fix individual outliers in the editor.
Privacy first
The editor works entirely locally with your browser's canvas. Filters, text, crop and export are computed on your device, and the PDF is created there as well. No image is uploaded to a server.
Edit a photo in the single image editor now — with before/after comparison, free in your browser.
Open the image series editor →